jobman.sh reference
The jobman.sh is stored in the /ceman/bin and has 3 commands:
- help: shows the description of the command.
- execute-on-jobs: given an input and an output file in CSV format, it applies specific actions to a set of Jobs.
- list: provides a list of Jobs according to the given filter.
Full list of parameters
Run jobman.sh/help to have the full list of parameters in alphabetical order.
root@ceman:/ceman/bin#./jobman.sh help
Usage: jobman [-hLV] [-c=<charset>] [-C=<connectTimeoutseconds>]
[-e=<secureEndpoint>] -o=<OutputFile> [-R=<readTimeoutseconds>]
-u=<username> (-p=<passwordFile> | -P) [COMMAND]
Parameters written in square brackets are optional. Parameters without square brackets are mandatory.
Have you already found them? Let's have a closer look.
Optional parameters
- [-c, --charset=<charset>]: charset used to read and write files. The default is UTF-8.
- [-C, --connect-timeout-seconds=<connectTimeoutseconds>]: connection timeout that can be set on the connection. The default is 300 seconds (5 minutes).
- [-e, --endpoint=<secureEndpoint>]: CEMAN instance the command line must point to. The instance must be specified in the https://ceman:9443 format. The parameter is optional since the command detects the https port of the CEMAN where the command line is running and connects automatically.
- [-h, --help]: shows the help. Added to a command, information about the command is given.
- [-L, --enable-console-log]: enables information at console log level. This is useful for the helpdesk and for troubleshooting.
- [-R, --read-timeout-seconds=<readTimeoutSeconds>]: read timeout that can be set on the connection. The default is 300 seconds (5 minutes).
- [-V, --version]: prints version information and exits.
Mandatory parameters
- -o, --output-file=<outputFile>: relative or absolute path of the output CSV file.
- -u, --username=<username>: user connecting to the system.

-
-p, --password-file=<passwordFile> and -P, --password: parameters used to specify the user's password. You can choose between:
- -p, --password-file=<passwordFile>: the user's password is specified in a file, in plain text and in a single line.
- -P, --password: the password is typed on the console interactively.
-
[COMMAND]: command to be executed. help is the command to display the help; execute-on-jobs is the command to execute actions on a list of jobs; list is the command for a list of actions.
help + <command> provides information about the command. In the picture below, the result of the jobman.sh help list command:
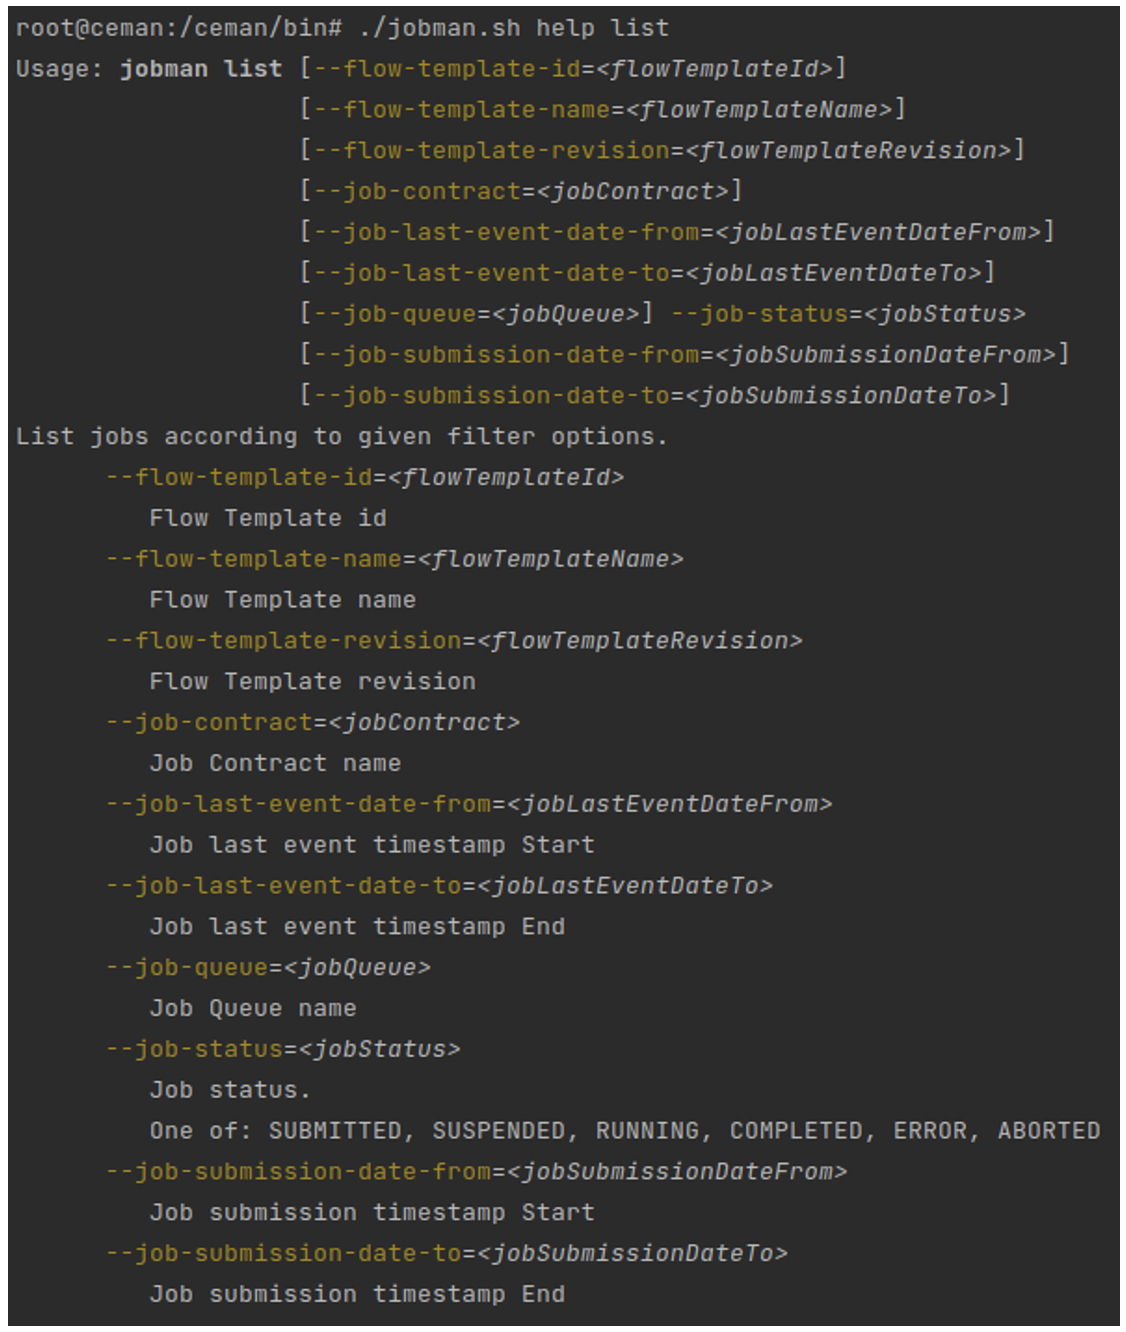
The final section provides information about timestamp processing. It contains the format expected by the command line. It is the ISO 8601 with the optional TimeZone. If it is not set, the default of the operating system is used. Z indicates the absolute UTC format, but it can also be set in the hours:minutes format.

How to use commands and parameters
Example: Listing jobs in ERROR
To have a .csv file with the list of jobs in status ERROR, we must set the parameters in this way:
./jobman.sh -u=admin-superuser -P -o=list.csv list --job-status=ERROR
Where:
- -u=admin-superuser: username
- -P: the password will be entered in interactive mode
- -o=list.csv: name of the output file
- list: command
- --job-status=ERROR: only jobs in this status will be listed
The command will produce the list.csv file with these columns:
- job_id: ID of the job
- status: can be Submitted, Suspended, Running, Completed, Error or Aborted
- contract_name: name of the contract
- flow_template_name: name of the Flow Template
- flow_template_revision: revision of the Flow Template
- queue_name: name of the queue
- submission_date: timestamp of the submission date
- last_event_date: timestamp of the last job event
- version: internal use to have fine-grained versioning of the job
This list is useful to execute actions with the execute-on-jobs command (which uses the job_id and the version).
The execute-on-jobs command has 2 mandatory parameters:
-
<action>: the action that must be performed on the jobs. Possible values are: abort, abort-resubmit, change-queue, resubmit, resume, suspend.
This parameter also lists the actions available for each job status:
• SUBMITTED: abort, change-queue, suspend
• SUSPENDED: abort, change-queue, resume
• RUNNING: abort
• COMPLETED: resubmit
• ERROR: abort, abort-resubmit, change-queue, resume
• ABORTED: resubmit -
-i, --input-file=<inputFile>: name of the input file, in CSV format.
For the resume, abort and suspend actions, the job_id and version columns are mandatory.
For the change-queue action, the job_id, version and change_queue_name columns are mandatory.
For the abort-resubmit and resubmit actions, the job_id, version and resubmit_queue_name columns are mandatory.
Example: Resuming two jobs
Let's go on with our example and resume two jobs.
We set these parameters:
./jobman.sh -u=admin-superuser -P -o=result.csv execute-on-jobs -i=list.csv resume
Where:
- -u=admin-superuser: username
- -P: the password will be entered in interactive mode
- -o=result.csv: name of the output file
- execute-on-jobs: command
- -i=list.csv: name of the input file
- resume: action to be applied
The result will be:

As you can see, each row is updated with:
- <action>: the action required, in our example RESUME.
- <action_result>: the outcome of the action, in our example SUCCESS.
- <action_timestamp>: when the operation was performed.
In case of FAILURE these columns will be added:
- <action_failure_code>
- <action_failure_message>
Updated 11 months ago