Configuring Rules
To create a new Rule, click the New Rule button at the top right-hand corner. The New Rule dialog window will appear.
Depending on your needs, in this window you can:
- Use one of the 4 templates already configured
- Create a new rule from scratch
On the left of the window, 4 configured Rule Templates are listed:
.png")
As you can see in the figure above, 2 templates define rules to limit the Jobs executed in parallel and 2 templates assign priorities to the Jobs to be executed. In other words, there are 2 templates of “limit” type and 2 templates of “priority” type.
To see the attributes defined for each Template, simply click the template name on the list. Its values will be loaded on the right. As you can see in the figure above, the second template is of limit type, it has 100 maximum parallel transfers in output, for protocol PR4 and the rule is applied to a specific Actor.
Once you have identified the template that best suits your needs, click the Use button at the top right-hand corner to proceed with its configuration. The New Rule dialog window will appear, loading the attributes defined for the template and allowing you to add the attributes you need to further customize your Rule.
To customize your Rule, assign it a name in the New rule field.
Then, you can set the limit of concurrent transfers in the TO edit box – in the figure above, the limit is set to 100. If you are creating a priority-type Rule, in this field you will assign the priority to the Jobs to be executed.
Now you can select the conditions in the drop-down lists on the left and the attribute on the right.
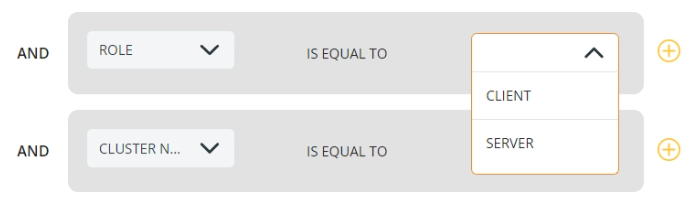
Note: The Direction, Data One Role and Cluster Name attributes are mandatory and cannot be deleted.
This is the list of the existing attributes and their relevant description:
| Attribute | Description |
|---|---|
| LIMIT (*) or PRIORITY (*) | The Rule sets the maximum number of parallel transfers allowed or The Rule assigns a priority to the Job executed |
| TO | Limit-type Rule: enter the maximum number of parallel transfers Priority-type Rule: enter the priority of the Job. The higher the number, the higher the priority |
| DIRECTION (*) | Direction of the transfer: Input or Output |
| DATA ONE ROLE (*) | PRIMEUR Data One can be a Client or a Server |
| CLUSTER NAME (*) | Select one of the configured Clusters |
| SOURCE | To fill in this field, keep the values entered in the Client Connection Tab close at hand. Refer to Actor Menu > Actor Configuration > Client Connection Tab for details. The content of the Source field depends on the Protocol and on other attributes. For PR4, PR5 and PR5S Protocols: - when DIRECTION is set to Input, the SOURCE is the value entered in the QMANAGER NAME field when creating the client connection. - when DIRECTION is set to Output, the SOURCE is the value entered in the LOCAL QM field when creating the client connection. For all protocols different from PR4, PR5 and PR5S: - when ROLE is set to SERVER, the SOURCE is the name of the Actor. - when ROLE is set to CLIENT, the SOURCE is not needed. |
| DESTINATION | To fill in this field, keep the values entered in the Client Connection Tab close at hand. Refer to Actor Menu > Actor Configuration > Client Connection Tab for details. The content of the Destination field depends on the Protocol and on other attributes. For PR4, PR5 and PR5S Protocols: - when DIRECTION is set to Input, the DESTINATION is the value entered in the LOCAL QM field when creating the client connection. - when DIRECTION is set to Output, the DESTINATION is the value entered in the QMANAGER NAME field when creating the client connection. For all protocols different from PR4, PR5 and PR5S: - when ROLE is set to CLIENT, the DESTINATION is the name of the Client Connection - when ROLE is set to SERVER, the DESTINATION is not needed. |
| PROTOCOL | Select the Transfer Protocol to which the Rule will be applied |
| SERVER | Choose the Server configured on the selected peer |
| PARTNER | Select the Partner to which the Rule will be applied |
| DESCRIPTION | Define a Description for the Rule |
| PEER NAME | Select the endpoint Peer Name for the Rule |
On the right of the value, the ![]()
![]() buttons allow you to add a new Attribute and to remove it from the list.
buttons allow you to add a new Attribute and to remove it from the list.
On the right of the window, use the WHEN section to define the time interval when the Rule will be applied. As you can see, you can define multiple time slots simply clicking the  option. Leave this field empty to have the Rule enabled all day long.
To remove a Time slot, click the
option. Leave this field empty to have the Rule enabled all day long.
To remove a Time slot, click the ![]() icon.
icon.
If you prefer to create a new rule without using a template, click the CREATE YOUR RULE button in the New Rule window.

The same window shown for the template-created Rule will appear without loading any value in the attributes fields. The same options and attributes as for the pre-configured Rules apply, so refer to the section above for details.
Once you have defined the attributes for your Rule – either based on a Template or not – click the Save button. Your Rule will be added to the Home Page where the standard search, visualization, sorting, editing and deleting options are available.
Updated over 1 year ago