Connection Contracts Tab

The Connection Contract defines the mapping between a User/Group, a Local Server and a Virtual File System. There can be one and only one Connection Contract for each available server defined for that Actor (i.e. Company, Partner or Application).
The Connection Contract tab has 3 specific options that execute different actions:
- Contract Clauses: define the mapping between an Actor User, a protocol and a Virtual File System.
- Associated VFS/Rule: associate File Processing Rules with the VFS. In particular, here you define also the input direction (i.e. upload of a file into Data One) or output direction (i.e. download of a file from Data One) and the Virtual Box (i.e. metadata to be associated with the file).
- File Processing Rule: manage File Processing Rules, i.e. the actions that will be applied to the file during the transfer phase, such as encoding, signature, zip, etc.
To configure a Connection Contract, you need to configure Clauses for the Actor:
- Go to Actors and click the Actor Name or the
 icon.
icon. - Click the Connection Contracts tab.
- Click the Contract Clauses option and the New Contract Clause button to add a Clause to the selected Actor.
- The first mandatory step is to assign a Name and a Description to the Clause you are creating.
- Click Save and Continue to move to the Connection part of this wizard.
- In the Connector window, click the Select Server button to associate your Clause to a Server – this is needed to configure VFS, Users and Groups.

A Clause can be associated to one and only one server.
- Select the Server you want to associate to your Clause and click the Confirm button.

Hint!
If needed, you can filter servers by Cluster. For example, in the figure below, only servers belonging to Cluster1 are listed.
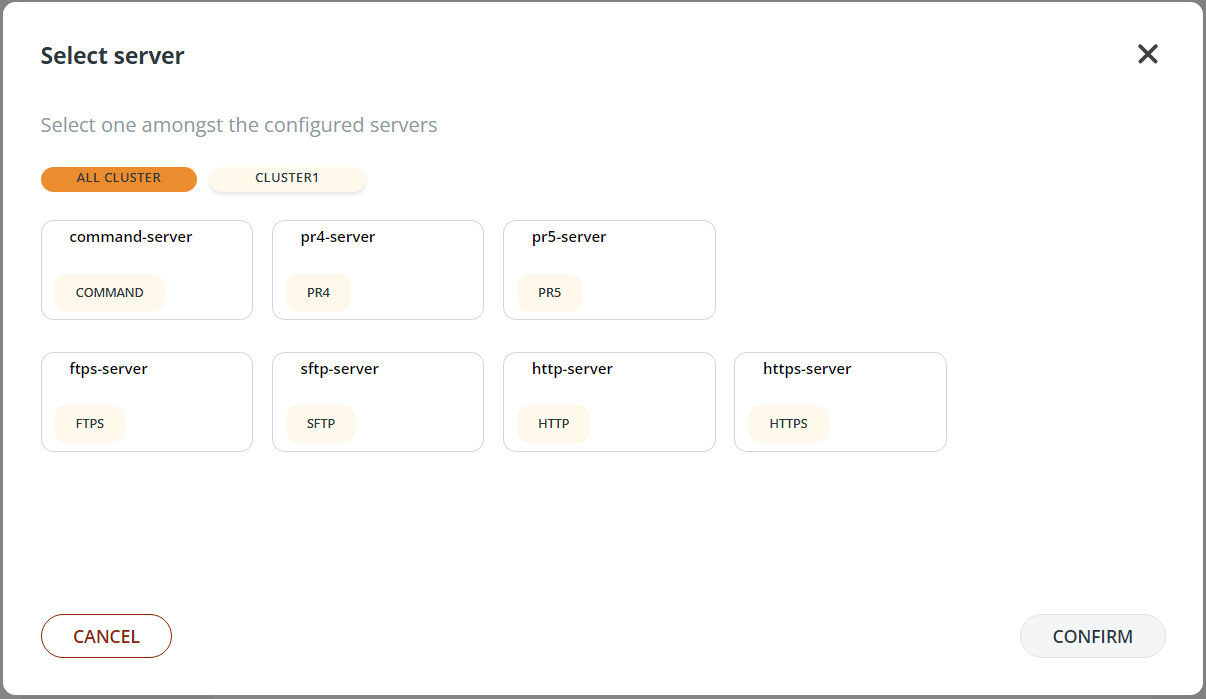

Warning!When you select a PR4, PR5 or PR5S server, remember that associated Virtual File Systems must be defined as described here: Virtual File Systems and Spazio 2 protocols PR4 and PR5.
You can now proceed and add Users and/or Groups.
-
Click the Add User or Group button and fill in the fields of the window according to your needs.
First, select whether to access the VFS path via direct assignment or provide VFS access
through assigned groups.
If you select direct assignment, insert the VFS and VFS path.Then, select the Users/Groups. In the drop-down list, choose the Users and Groups you
want to grant access to.(Only for the FTP, FTPS, SFTP; HTTP; HTTPS; PR4, PR5 and PESIT protocols) If needed, you can add custom file upload limits for every User/Group by switching the Upload limit toggle to ON. You can then choose the maximum file size and the unit of measurement. Possible values are: KB (default), MB, GB and TB. Note that limits placed on Users supersede limits on Groups.
-
Click on the ADD button. The User/Group will appear in the list below. Click on the
 icon to delete the assignation.
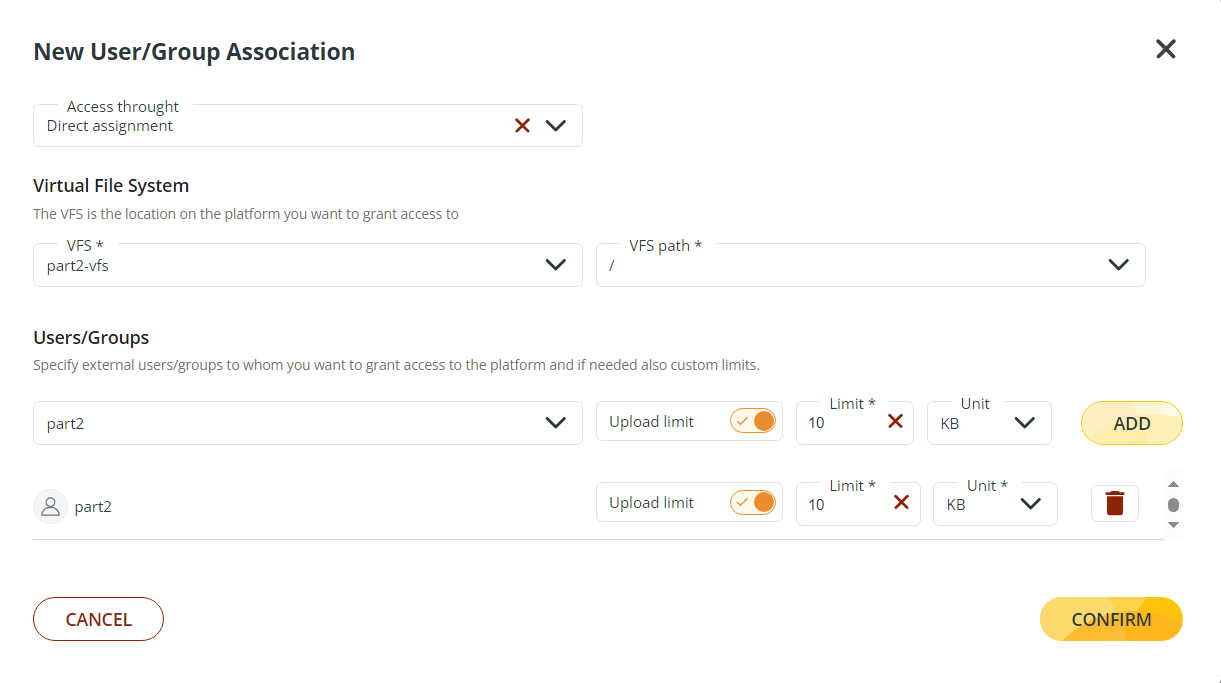
- Click Confirm.
You have created the Connection Contract, associating the path with the User.
The VFS called part1-vfs, connected to the server ftp-server, is connected to user PART1.
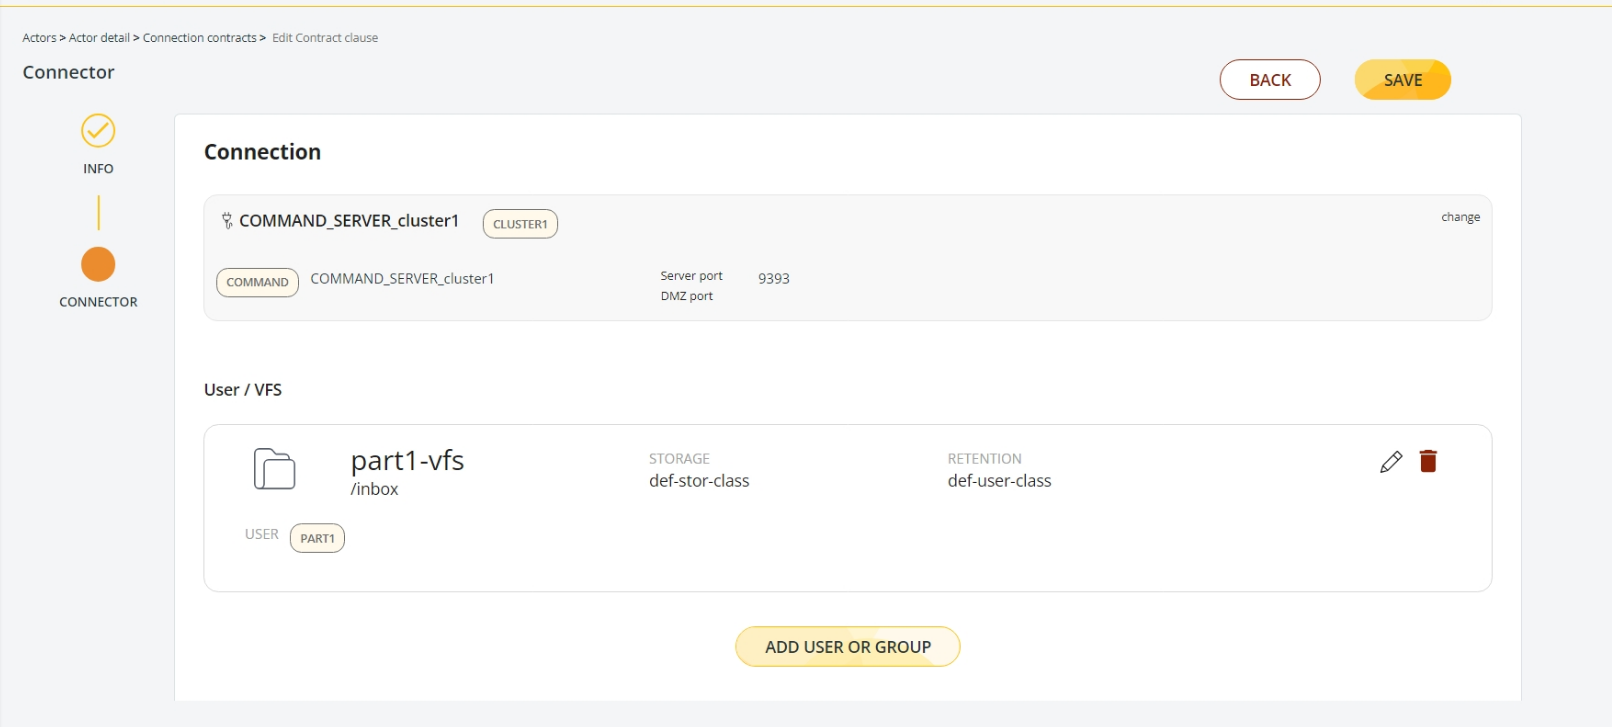
Click the Save button when you are happy with the configured items of the Clause in order to save it and get to the Actor page. The Contract Clauses section now lists the newly created Clause, which can be edited or deleted with the standard edit and delete ![]() icons.
icons.
Associating the VFS with File Processing Rules
To associate a VFS with a File Processing Rules, follow these steps:
-
In the Associated VFS/RULE section, click the New associated VFS/RULE button.
-
In the Virtual File System window, click the SELECT VFS button.
-
In the Add Virtual File System window, select the VFS and the VFS path and click Confirm.
-
In the Virtual File System window, click Save and Continue.
-
In the File processing rule window, you can either:
-
choose to use an already existing file processing rule: click the Select existing file button and choose one of the listed File processing rules. Then, click the Confirm selection button.
-
create a new file processing rule: click the Add New button and proceed with the creation of the Processing Rule filling in the required fields:
i. name and description of the rule
ii. file pattern
iii. file resources
iv. virtual box – select one of the listed Virtual Boxes or create a new one clicking the View All option.
v. set the file processing rule as default (optional) to apply the rule to all paths.
-
For more information on these fields, head over to the File Processing Rules section.
- Click Confirm and verify that the configuration is correct.
- Select when the rule will be applied: INPUT or OUTPUT.
- Click Save to confirm.
File Processing Rule
To manage all File Processing Rules linked to the Actor, go to the Connection Contracts tab and click the File Processing Rule chip.
Here you can both view the File Processing Rules already associated with the selected Actor and create new Rules.
To create new Rules, follow these steps:
-
Click the NEW FILE PROCESSING RULE button.
-
In the New file processing rule window, fill in these fields:
a. Name and Description of the rule.
b. File pattern – specify to which files the File Processing Rule will be assigned. By default: . (all files).
c. File resources – refer to the File Resources section for details.
d. Virtual box – select one of the listed Virtual Boxes or create a new one clicking View All > New VirtualBox option.
e. Set the file processing rule as default (optional) to apply it to all paths when selected for the Contract.
Remember! You must configure at least one of these two options: File Resource or Virtual Box!
- When done, click Confirm to save. The newly created rule will be added to the list of Rules.
Warning!Whenever a File Processing Rule is needed, it must be associated with the Virtual Path to be used. Therefore, the File Pattern can be used to filter the files where the File Processing Rules will be applied or can be left generic and the File Processing Rules will be applied to each file within the Virtual Path.
To better describe the usage guidelines for File Processing Rules, these are some sample Use Cases:
Receiving a file through SFTP with saving in Data One in DATA format
Configuration of File Resource:
- mime remote = text/plain
- charset local = 819
- mime local = text/plain (or null)
- charset local = 819 (or null)
Data One receives a file through PR4 with PGP encrypted save in PRIMEUR Data One
Configuration of File Resource:
- secure remote = NONE
- secure local = PGP
Data One receives an uncompressed file through PR4, with compressed saving in PRIMEUR Data One
Configuration of File Resource:
- compression type remote = null
- compression type local = SPZIP
Data One receives a compressed file through PR4, with compressed save in PRIMEUR Data One
Configuration of File Resource:
- compression type remote = SPZIP
- compression type local = SPZIP
Data One has an uncompressed file and sends it compressed through PR4
Configuration of File Resource:
- compression type remote = null
- compression type remote = SPZIP
Creating Virtual Boxes
A Virtual Box is a way to classify data. It can be seen as a tag applied to a file. Mediation and output contracts can be triggered when a file is tagged or untagged.
To create a Virtual Box, follow these steps:
- Go to the New File Processing Rule window.
- In the Virtual Boxes field, open the drop-down list and select View all.
- You will access the Select VirtualBox section.
- Click New VirtualBox in the top right to open the New VirtualBox window.
- Assign a Name and a Description to the Virtual Box you are creating and click Create.
- Select the created Virtual Box and click the Confirm button.
And now you have created your new Virtual Box! Super!
Updated 3 months ago