Modeling Dataflows
Dataflows can be enriched with specific information so that they become more meaningful to business users.
Modeling features include:
- labeling of specific business flows so that they are recognized for a function
- management of the arrival of files
- processing of files on specific nodes through cut-offs
- definition of flow matching rules
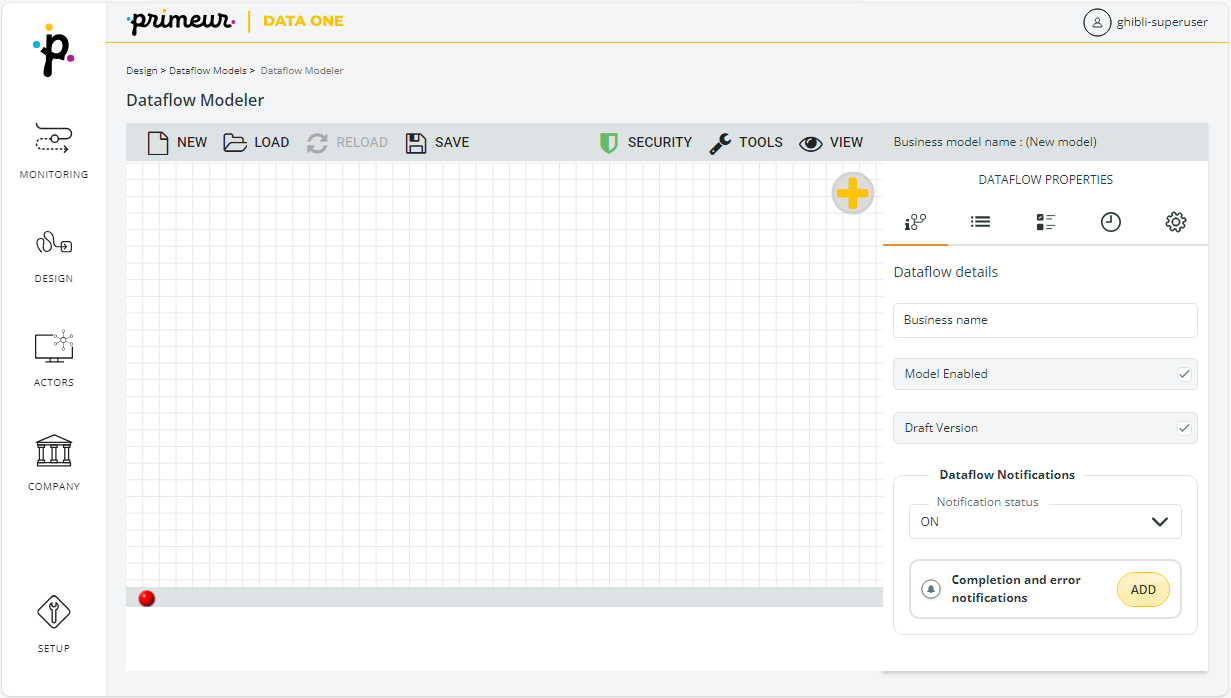
Dataflow Modeler
To access the Dataflow Modeler, go to Design > Dataflow Models.
The board shown in the following figure will open.

Hint!
The same board appears when clicking the MODEL AS FLOW button in the Flow Details.
Of course, in this case the flow will be already loaded in the board.
At the top of the Dataflow Modeler board there is a toolbar with these options:
The NEW button
The NEW button is used to... open a portal to a parallel universe. No, we are kidding, the NEW button unsurprisingly creates a new Model from scratch.
The LOAD button
Check out how to retrieve already existing Models here.
The RELOAD button
We know you would never make mistakes, but if you do, use the RELOAD button to restore the Model to the last saved version.
The SAVE button
Never forget to save your Models! Click on the SAVE button and choose whether to save the Model as Draft or, once you have saved it at least once, promote it to Master. What are you waiting for? Save now!
The SECURITY button
The SECURITY button is used to authorize specific Users or Groups to access Models. See Authorizing Users or Groups to access models.
The TOOLS button
The TOOLS button allows you to access these options:
- Enable/Disable Model
- Export Model
- Upload Model
Enabling and disabling master version models
A master version model cannot be deleted but it can be disabled selecting TOOLS > Enable/Disable Model.
The model status is shown in the Dataflow Properties panel.
Exporting models
To export a model, follow these steps:
- Go to Design > Dataflow Models > NEW and click the LOAD option.
- Load a model from those listed.
- Click the TOOLS menu and select EXPORT MODEL.
- The model will be download as .txt file on your local disk.
Uploading models
To upload a model, follow these steps:
- Go to Design > Dataflow Modeler and click the TOOLS > UPLOAD MODEL option.
- Click the UPLOAD button.
- Browse your local drive to locate the model (it must be a .txt file) and upload it.
- Click the CONFIRM button to proceed with the upload.

The VIEW button
Use the VIEW button to zoom on your Model.
The Dataflow Model lifecycle
In their life-cycle, Models can have 2 statuses: Draft and Master.
When they are created, Models are in status Draft, i.e. they are not associated with incoming data flows. These Models can still be edited.
Once promoted to Masters, Models can be used to enrich incoming data flows. Models in status Master cannot be edited.
If you need to modify a Master Version, you must create an editable copy of the Model clicking the SAVE button on the Dataflow Modeler toolbar and selecting Open Draft Version. Apply your changes and save the Model again in Draft or Master.
Let's look at the Flow Model Lifecycle from creation (Draft status) to delivery (Master status):

By clicking the SAVE button on the Dataflow Modeler toolbar, the following menu appears allowing you to manage the Dataflow Model lifecycle:
- Save: the Model is saved in DRAFT Status for further changes.
- Save as new Model: a new Model is created in DRAFT Status. The new Model created has the same settings as the original Model.
- Promote as Master Version: the Model is saved in MASTER Status. Note that when set to MASTER, a Model cannot be modified.
- Open Draft Version: this menu is used to edit a Model saved as MASTER. By selecting this option, the MASTER Model is set to Status DRAFT and becomes editable. Of course, when saving the edited Draft version to Master, the previous Master version will be overwritten.
Creating a data model from scratch
To create a Model from scratch, follow these steps:
- On the toolbar, click the NEW button.
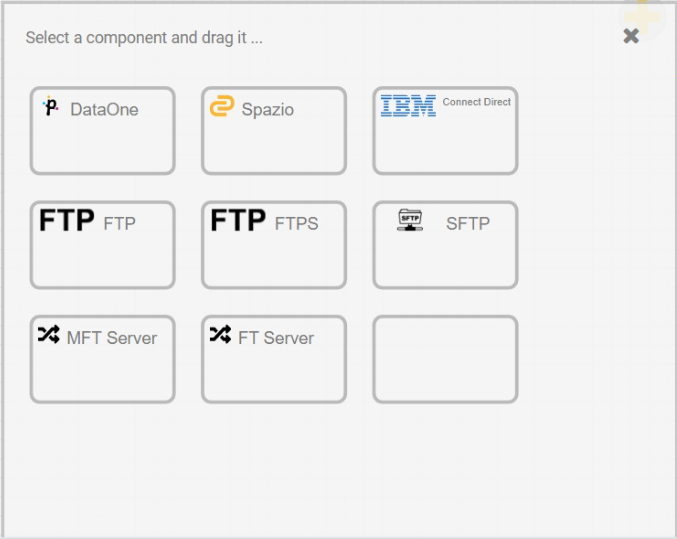
- Start drawing the model by dragging nodes from the
 panel and dropping them on the board.
- To connect nodes, use the arrow appearing clicking the
 icon and select the
  LINK option.

- Define rules as detailed in the Matching criteria page.
- Enter a Business Name for the Model.
Note: The Model name must have at least 5 characters. - Click the Save button to confirm the creation of a Model in Draft status.
As an alternative, you can create a Data Model clicking the MODEL AS FLOW button in the Inquiry section. The Model will be created starting from the Data Flow already retrieved by the system.
Clicking the MODEL AS FLOW button, the Flow Modeler section will appear.
Retrieving existing flow models
To retrieve an already existing flow model, follow these steps:
- On the toolbar, click the LOAD button.
- Click on the SEARCH button. The search can be filtered with the Show only enabled Model option by clicking on the plus sign button.
- Select the model. If it is loaded correctly, the Model loaded successfully warning will appear in the lower left corner.
- If needed, the Model can be modified. Remember that it must be set to DRAFT version to be edited.
When a Draft Version is modified, a red ball appears in the bottom left corner.
The version of the Model is not saved. Select the Save button and then Save to update it to the newest version. The version of the Model is updated to the newest.
Restoring a flow model
To remove all changes applied to a Model and restore it to the last saved version, press the RELOAD button on the Toolbar.
Dataflow Properties panel
In addition to the Toolbar, the Dataflow Modeler board is provided with a Dataflow Properties panel on the right.
This panel has 5 separate sections, which can be accessed clicking these icons: ![]()
![]()
![]()

![]()
Click the![]() icon to access the Dataflow details panel listing these options:
icon to access the Dataflow details panel listing these options:
- Business Name: name assigned to the Model.
- Model Enabled: this option can be changed clicking the Tools icon on the Toolbar.
- Draft Version: if checked, this model is a Draft Version. This option is read-only and cannot be updated.
- Dataflow Notifications: use this option to set the notification status to on or off.
- Completion and error notifications: see existing notifications or create a new notification.
Click the![]() icon to access the Dataflow attributes panel. Dataflow attributes must be configured by Administrators – see Dataflow Attributes for details.
icon to access the Dataflow attributes panel. Dataflow attributes must be configured by Administrators – see Dataflow Attributes for details.
When starting writing in each edit box, the auto-complete option will suggest matching values. The asterisk * next to the attribute value means that the attribute is mandatory: at least one value must be specified or selected.
If the attribute is an Open Dictionary type, you will be able to add new values when filling in this Dataflow Modeler section – refer to Dataflow Attributes for details about Open and Close Dictionaries. To add a new value, type the value in the edit box and select the Add to dictionary option.
When selecting a value, the list of existing values will be shown.
Click the![]() icon to access the Matching criteria panel. If you want to know more about Matching Criteria follow this link. Learn how to set them here.
icon to access the Matching criteria panel. If you want to know more about Matching Criteria follow this link. Learn how to set them here.

Click theicon to access the Dataflow cut-off panel. You can learn more about cut-offs here.
Click the![]() icon to access the Dataflow Interface settings panel listing these options:
icon to access the Dataflow Interface settings panel listing these options:
- Resizable nodes: if checked, the node can be resized.
- Draggable nodes: if checked, you can drag the node.
Node Properties panel
The Node Properties panel shows the details of a node that is part of a Model. To show the Node Properties panel, click a specific node in the board.
This panel has 2 separate sections, which can be accessed clicking these icons: ![]()

Click the ![]() icon to access the Node Details panel to set:
icon to access the Node Details panel to set:
-
Business Name: name assigned to the Model.
-
One of the following options:
- CEMAN Name for Data One nodes
- Queue Manager Name for SPAZIO nodes
- Connect:Direct Server for Connect:Direct nodes
- FTP Server for FTP nodes
- FTPS Server for FTPS nodes
- SFTP Server for SFTP nodes
- Generic MFT Server for MFT Server nodes
- Generic FT Server for FT Server nodes
- Name for Unknown nodes
-
Node Type: it is assigned automatically by Data One and cannot be modified.
Click the icon to access the Node Cut-off list panel where you can:
- see the cut-offs associated with the selected node.
- add a node cut-off, clicking on the NEW button. To know more about Cut-offs and how to set them, head over the Setting Cut-offs page.
Updated 3 days ago