Primeur Online Docs
Data Mover 1.20
Data Mover 1.20
  • 🚀GETTING STARTED
    • What is Primeur Data Mover
    • Main features of Primeur Data Mover
    • Primeur Data Mover deployment
    • Navigate through Primeur Data Mover
  • 👥Actors
    • Who are the actors
    • Create your first actor
    • Configure an actor 🚀
      • Users Tab
      • Groups Tab
      • VFS Tab
      • File Resource Tab
      • Connection Contract Tab
      • Client Connections Tab
    • Search files by actor
    • Actor Lineage 🚀
      • Aggregation of flows by protocol 🚀
      • Lineage with connection contracts 🚀
      • Lineage with input, mediation and output contracts 🚀
      • Lineage with any contract type 🚀
  • 📝Contracts
    • What is a contract
    • Create your first contract
      • Create an Input Contract
        • Define the contract info
        • Associate the contract with the actor
        • Define the contract actions
        • Set the contract variables
      • Create a Mediation Contract
      • Create an Output Contract
      • Create a Connection Contract
        • Create a contract clause
        • Associate the VFS with file processing rules
        • File Processing Rules
    • Managing contracts 🚀
  • 🧱Workflows
    • What is a workflow
    • Create your first workflow template
    • Trigger types
      • Trigger types for input contracts
      • Trigger types for mediation and output contracts
    • Service tasks
      • Standard service tasks
      • Triggerable service tasks 🚀
      • Spazio selectors and filebox metadata management
      • Error management
    • Variables
      • Variables in workflows and contracts
      • Handling process variables
    • Workflow templates
      • System workflow templates
        • Workflow templates for input contracts
        • Workflow templates for mediation contracts
        • Workflow templates for output contracts
      • Custom workflow templates
        • Workflow template toolbar
        • Workflow template Shape repository panel
        • Workflow template working area
        • Workflow template BPMN-diagram panel
      • Error workflow templates
    • Editing workflow templates
    • DataFlow Instance Context (DFIC) 🚀
  • 🔓Security
    • Identity and Access Management
    • Users & Groups
      • Setting the password policy
      • Creating Internal Users 🚀
      • Creating Internal Groups
      • Creating External Users
      • Creating External Groups
    • Key Stores and Trust Stores
      • Key Store 🚀
        • Creating a Key 🚀
        • Creating a Certificate 🚀
        • Importing a Key or a Certificate
        • Creating a Symmetric key
        • Examples
      • Trust Store 🚀
        • Importing Keys 🚀
        • Importing Certificates
      • Untrusted Cache 🚀
      • Trusting an element
        • When do I use the Keys tab?
        • When do I use the Certificates tab?
      • PGP Key Store / PGP Trust Store
        • Configuring the PGP Key Store
        • Importing keys into the PGP Trust Store
  • 🛸TRANSPORT PROTOCOLS AND CONNECTORS
    • Data Mover client and server roles
    • Client Connections
      • Client Connection: FTP
      • Client Connection: FTPS
      • Client Connection: SFTP
      • Client Connection: HTTP
      • Client Connection: HTTPS
      • Client Connection: PESIT
      • Client Connection: SMB v3 or later versions
      • Client Connection: POP3 IMAP
      • Client Connection: SMTP
      • Client Connection: PR4/PR4S
      • Client Connection: PR5
      • Client Connection: PR5S
      • Client Connection: HDFS
      • Client Connection: HDFSS
      • Client Connection: Amazon S3 🚀
      • Client Connection: Google Cloud Storage
        • Credentials
      • Client Connection: Azure Blob Storage
      • Client Connection: IBM Sterling Connect:Direct
      • Appendix
    • Server Connections 🚀
      • Server Connection: FTP
      • Server Connection: FTPS
      • Server Connection: SFTP
      • Server Connection: HTTP
      • Server Connection: HTTPS
      • Server Connection: PeSIT
      • Server Connection: PR4
      • Server Connection: PR5
      • Server Connection: PR5S 🚀
      • Server Connection: IBM Sterling Connect:Direct
    • Stopping all servers in one go
  • 🛰️DMZ GATEWAYS
    • DMZ Gateways
    • DMZ Clusters
  • 🎧FILE EVENT LISTENER
    • What is the File Event Listener
    • Configuring File Event Listeners
      • Setting the File Event Listener Engine
      • Defining a contract for the File Event Listener
      • Setting events to be monitored
    • RegEx Rules 🚀
    • Monitoring File Event Listeners
  • 🔍ICAP
    • ICAP Engines
    • Configuring an ICAP Engine
    • Defining an ICAP rule
  • 📚CLUSTERING
    • STENG, Clusters and Servers
    • Adding a cluster and a STENG
    • Deleting a STENG
  • 🕒MONITORING
    • Jobs
      • Details about Jobs 🚀
      • jobman.sh CLI
    • Job Manager
    • Job Queues
      • Managing Job Queues
    • File Transfers
      • Ongoing
      • Finished
      • Reports
    • File Transfers Rules
      • Configuring Rules
  • 🤓ADMINISTRATION
    • Storage Classes 🚀
      • Storage Class: File System 🚀
      • Storage Class: SMB v3 or later versions 🚀
      • Storage Class: Amazon S3 🚀
      • Storage Class: Google Cloud Storage 🚀
      • Storage Class: Azure Blob Storage 🚀
    • Retention Classes
    • Virtual File Systems (VFS) 🚀
      • Creating a VFS 🚀
      • Configuring a VFS
      • Adding Virtual Paths
      • Modifying and Deleting a VFS
      • Searching files in all VFS
    • File Resources
      • Creating File Resources
      • Navigating File Resources
      • How to use File Resources
    • Advanced Settings
  • 👑FILE MANAGER
    • Getting started
    • Logging into File Manager
    • Managing the File Manager 🚀
      • The list of results
      • Creating new folders
      • Uploading files
      • Downloading files 🚀
      • Searching for files and folders
      • Deleting files 🚀
      • Bulk actions 🚀
    • File Manager and VFS
    • Customizing File Manager externals
      • The configuration-wui.json file 🚀
      • How to customize the Login window and the logo
      • How to customize the footer
      • How to configure the Upload with Metadata option
      • How to customize bulk actions 🚀
  • 🧑‍⚖️FILE ROUTING
    • What is File Routing 🚀
    • Routing Rules page
      • The Rules tab
      • The Categories tab
      • The Output tab
    • How to create a rule 🚀
      • Add metadata 🚀
      • Select ACTIONS
      • Select OUTPUTS
      • Policy for the selection of metadata rules
    • Configuration of the environment in Data One
      • Set up Storage Classes
      • Set up Retention Classes
      • Configure the Actor
      • Set up File Resources
    • Associate the Routing Rule with a Contract
    • Example
  • 💬LOGS & AUDIT
    • Logs 🚀
      • Logs options 🚀
      • Troubleshooting error analysis in Logs
    • Audit Options 🚀
      • Export audit logs 🚀
      • List of Audit entity types 🚀
      • Audit message codes 🚀
    • Log Notifiers 🚀
      • FEL message codes
  • 📩NOTIFICATION CHANNELS
    • What are Notification Channels
    • Configuring the default Email Notification Channel
    • Configuring a new Email Notification Channel
    • Trusting Certificates
    • Managing Templates
      • Data Watcher Macros
      • Contract Macros
      • ICAP Macros
      • Central Log Macros
      • Email Templates
      • Editing default templates
      • Loading a new template
  • 🟣DATA MOVER + DATA WATCHER
    • Data Mover in a bundle with Data Watcher
    • Attributes 🚀
    • Cut-off Board
      • Cut-off Calendars
    • Dataflow Inquiry
  • 🟠DATA MOVER + DATA SHAPER
    • Data Mover in a bundle with Data Shaper
    • Monitoring
    • Execution History
    • Sandboxes
  • 💻API
    • HTTP MFT Rest API
    • Job Manager APIs 🚀
    • SFTP Server sessions APIs 🚀
    • Audit Logs APIs 🚀
  • 🧐HOW TO...
    • ... use different DNS names - NEW! 🚀
    • ... configure a Cron Expression
    • ... configure an Application
    • ... customize a header
    • ... run searches in Data Watcher 🚀
    • ... use Data Shaper graphs in Data Mover contracts
    • ... modify DMCFG and deploy it
    • ... tune Data One data retention
  • 🗒️RELEASE NOTES
    • Data One 1.20.10
    • Data One 1.20.9
    • Data One 1.20.8
    • Data One 1.20.7
      • Data One 1.20.7.1
    • Data One 1.20.6
    • Data One 1.20.5
    • Data One 1.20.4
    • Data One 1.20.3
    • Data One 1.20.2
    • Data One 1.20.1
    • Data One 1.20.0
Powered by GitBook
On this page
  • Add a cluster
  • Add a STENG to a cluster
  1. CLUSTERING

Adding a cluster and a STENG

PreviousSTENG, Clusters and ServersNextDeleting a STENG

Last updated 5 months ago

Let's now learn how to add a cluster to a STENG. It is very easy, just follow this procedure:

Add a cluster

To add a cluster, follow these steps:

  1. Click the Add Cluster button.

  2. In the Add Cluster window, assign a Name and enter a Description for the cluster. Enter the Maximum Number of Jobs configured for your cluster – note that at least 500 is recommended – and select the WPM Algorithm among the ones available, i.e., Round Robin, Balanced and Random.

  3. Once you are done, click the Create button.

As a result, an empty cluster will be added to the list of clusters available.

To edit or delete the cluster, right click the three-dot icon next to the cluster name and select the relevant option. Before deleting the cluster, a confirmation message will appear.

Add a STENG to a cluster

To add a STENG to a cluster, follow these steps:

  1. Select the Cluster clicking on it.

  2. Click the Add STENG button. Note: The Add STENG button is below the list of already created STENGs – if any.

  3. In the dialog window, assign a name and a description to the STENG.

  4. In the Server info section, enter the Hostname or address of the Server and the Command Server Port.

  5. To add configuration parameters for DMZ connection, enable the toggle button in the Connect to DMZ section and fill in the fields:

    1. Socket timeout secs: (Default value: 30). DMZ Driver/DMZ Gateway tunnel socket read/write/connect timeout in seconds; -1 implies infinite timeout.

    2. Idle timeout secs: (Default value: 90). Keep alive, in seconds for, checking connection between DMZ Driver and DMZ Gateway.

    3. Reconnection interval: (Default value: 10). Number of seconds after which a disconnected DMZ Driver will attempt a new connection to DMZ Gateway.

    4. Reconnection attempts: (Default value: –1). Number of connection attempts before a DMZ Gateway is considered definitely unreachable. -1 means infinite attempts.

    5. Reserved port range: (Default value: 50100-51100). TCP-IP port ranges to be used to open tunnels between DMZ Driver and DMZ Gateway. For each incoming/outgoing connection, one port should be reserved (2 ports are needed for FTP protocol).

    6. Local address: (Default value: 0.0.0.0). Local IP address that the DMZ Driver will bind for incoming/outgoing connections. Note: You can leave the proposed default values.

  6. To associate the STENG to a DMZ Cluster, enable the relevant toggle button. If needed, you can change the order of Cluster listed simply dragging and dropping the Cluster in a different position. The order of DMZ Clusters is important. You can activate as many DMZ Clusters as needed and they will be listed in their order of appearance, but their priority will be assigned to first in the list. For this reason, you can move DMZ Clusters simply clicking the Cluster name and dropping it at the desired position. You can add a new cluster clicking the Add Cluster button available in this dialog window. As you can see, there is no need to abandon this dialog window to create a new Cluster.

  7. Finally, click the Save button to add the STENG.

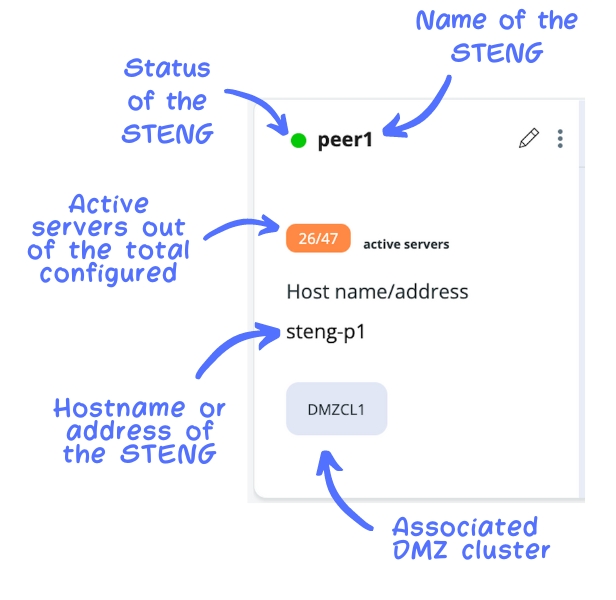
Each STENG has a card with useful information:

Note that the Stop action stops the STENG at function level but the JVM remains active.

You now have Stellar job!

An Edit option is available in the top-right corner, together with a 3-dot icon allowing you to Start, Stop and Delete the STENG. After selecting the Delete menu entry, a confirmation message will appear so that you can confirm the action.

📚