Managing contracts 🚀
The list of all contracts is available by going to Design → Contracts.

The Contracts main page is made up of different sections.
Filters panel
In the Filters panel on the right, these fields are available:
Contract name: enter the name of the contract or part of the name. The field is case insensitive, wildcard characters and Boolean operators are not supported.
Contract status: select Enabled or Disabled.
Contract type: select Input, Mediation, or Output.
Actor: select the actor to which the contract is assigned.
Workflow: select the workflow action associated with the contract.
Trigger: select the type of trigger firing the contract.
Dates: select the date when the contract was created, modified, or both.
An Advanced filter section is also available in the Filters panel allowing you to filter contracts by:
VFS: select a specific VFS to see only contracts where that VFS is configured.
Virtual Path: once you have selected the VFS, the virtual paths of the selected VFS are listed and you can filter contracts to see only those that have that specific virtual path.
Queue: select a specific queue to see only contracts where that queue is configured.
Cluster: select a specific cluster to see only contracts where that cluster is configured.
Virtual Box: select a specific virtual box to see only contracts where that virtual box is configured.
Results list
Existing contracts will appear in the Results list according to the criteria selected and can be sorted by:
Date when the contract has been modified
Contract name: A-Z - alphabetical order
Contract name: Z-A - reverse alphabetical order
Actor name: A-Z - alphabetical order
Actor name: Z-A - reverse alphabetical order
To sort contracts, click the ![]() icon next to the Modified, Contract, or Actor wording at the top of the result list.
icon next to the Modified, Contract, or Actor wording at the top of the result list.
🚀 A Contract status can be set to ENABLED or to DISABLED. To quickly change the status of a contract, click the 3-dot button and select the Enable contract or Disable contract menu according to your needs. To enable or disable multiple contracts in one go, select the contracts by checking the box on the left of the row and click the Change Status option at the top of the list. If you select a contract that is already in the destination status, a warning message will appear. To change the status, you can also edit the contract and use the toggle button in the panel on the right of the Edit contract page. Note that ENABLED contracts cannot be set to DISABLED if they are associated with an active FEL.
Toolbar
Go to this link to read the details on how to use the toolbar.
Options
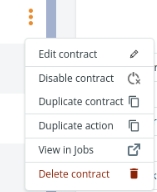
Select the ![]() 3-dot icon at the end of each result to:
3-dot icon at the end of each result to:
Edit the contract.
Disable the contract.
Duplicate the contract.
Duplicate the action.
🚀 Use the View in Jobs to jump to the Monitoring → Jobs page and see all the jobs associated with the selected contract. Jobs are not filtered by time slot. Jobs are ordered by the Last Event Date.
Delete the contract.
Contract detail page
Clicking on the Edit contract, Duplicate contract or Duplicate action entry, the Contract detail page will appear.

This page is composed of three different panels.
The first panel is located at the top of the page and displays the Name, Description, and Execution queue associated with the selected contract. The name of the contract cannot be edited. You can update the description of the contract and select a different execution queue.
The second panel is located on the right of the page and displays additional details about the Contract: the status, name and type of contract, the date when it was created and modified, its actor.
The third panel is the Actions section, with the list of actions associated with the Contract.
If you had selected the Edit contract option, you can edit the Actions fields, delete the action, and add new actions.
If you had selected the Duplicate contract option, the contract will be duplicated and you can edit the Actions fields, delete the action, and add new actions.
If you had selected the Duplicate action option, the action or actions will be duplicated and you can edit or delete them.
The options to Create, Edit, and Delete a Contract described in these sections are not visible to users having read-only permissions in the Contracts section of Data Mover.
Last updated