# Managing Job queues
To define queues to be used a Contract, go to **Setup** → **Job Queues**.
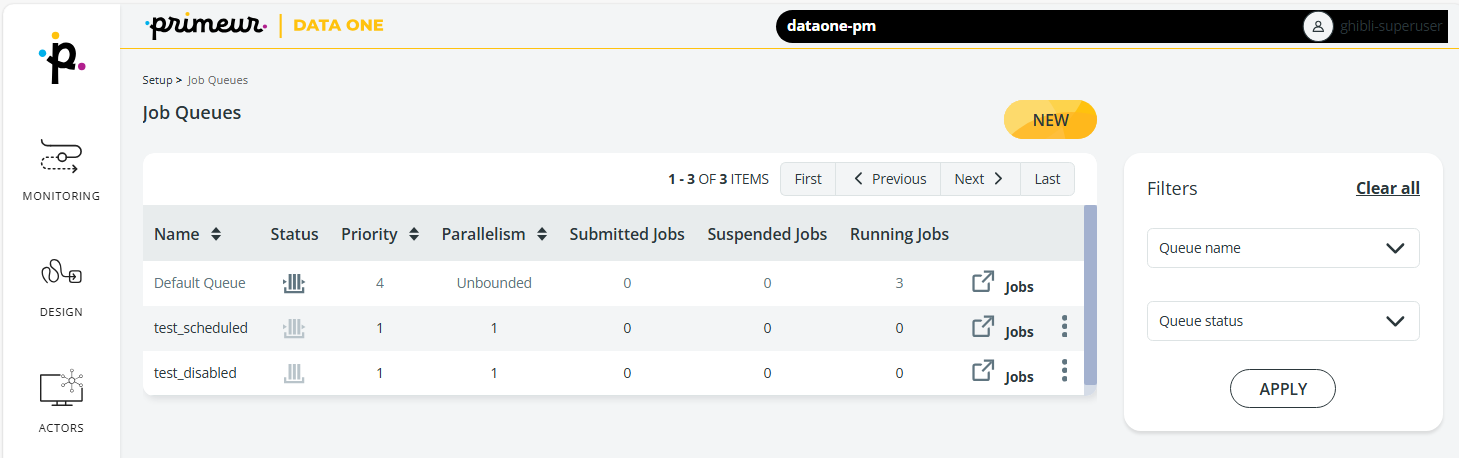
The **Job Queues** panel, shown in the following figure, will appear.
At the top of the panel, a bar shows the number of queues displayed out of the total number of queues existing. If more than 25 queues exist, these will be displayed on multiple pages that can be navigated by selecting the options available at the top of the window. The **First, Previous, Next,** and **Last** buttons will drive you to the relevant page.
{% hint style="info" %}
The number of queues displayed on each page is set to 25 and is not configurable.
{% endhint %}
To create a new queue with a different priority than the default onw, follow these steps:
1. Click the **New** button at the top of the page. The **New queue** window will appear.
2. In the **New queue** window, assign a unique name to the queue.
3. Define the **Status** of the queue choosing among:
1. **Enabled**: the jobs in the queue will be worked according to the priority and parallelism settings that you will define later.
2. **Scheduled**: the queue will be enabled only during scheduled time slots of the current day. Outside the specified time, the queue will be disabled. You can enter the time slot in the fields appearing when checking the **Scheduled** radio button. Multiple time slots can be specified in the day, e.g., \[8:00-11:00] and \[14:30-15:30] simply clicking the **Add time** **slot** button.
3. **Disabled**: the queue exists, but job scheduling is suspended.
4. Define the **Priority**: this is the priority that will be assigned to the jobs in the queue you are creating. Priority goes from 1 (very low priority) to 10 (very high priority). This field accepts only numbers.\
Jobs belonging to a queue having priority 3 will be executed before jobs belonging to a queue with priority 2. When two or more queues have the same priority, their jobs are executed according to a global FIFO order: jobs having lower ID are executed before jobs having higher IDs. For example, if job 245 and job 246 both have priority 3, job 245 is executed before job 246.
5. Define the **Parallelism**: this is the number of jobs that are executed concurrently on each CEMAN. This field accepts numbers: 0 means that no jobs are executed, 1 means that the job execution is serialized (a new job starts after the current job has been completed), 10 means that 10 jobs will be executed for the queue, and so on. You can also define unlimited parallelism by activating the **Unbounded** toggle switch – this action disables the Parallelism field.
{% hint style="info" %}
Administrators can configure the maximum number of jobs executed in parallel by going to **Setup** → **Advanced settings** → **job-manager** → **config** → **job.maxCemanParallelism** and editing the property by entering the number of parallel jobs in the PROPERTY VALUE field. The default is 50. This value is a multiplier: at runtime, the effective number will be Active\_Ceman\_Nodes \* job.maxCemanParallelism.
{% endhint %}
6. When done, click **Save** to create your queue.
In the result list, queues are organized in rows and columns.
Columns are self-explanatory, apart from these 3 that deserve a brief explanation:
* The **Status** column shows the status of the queue with icons enabled, disabled, and  scheduled. Hovering the mouse over the icon, a tooltip will appear.
* The **Jobs** icon on the right can be clicked to jump directly to the **Monitoring** → [Jobs](https://docs.primeur.com/data-mover-1.20/monitoring/jobs/job-monitoring) section and check the jobs belonging to the queue.
* The **3-dots icon** shows the Edit and Delete options. Note that:
* The default queue cannot be edited or deleted, so the 3-dots icon is not present.
* The name of the queue cannot be edited.
* A queue cannot be deleted if it has jobs still to be scheduled and if it is associated with a contract.
On the right-hand side of the screen, the **Filters panel** can be used to run queries by queue name or status:
* The **Queue name** drop-down list proposes all already created queues.
* The **Queue status** contains the ENABLED and DISABLED options. Scheduled queues fall into ENABLED.
 **Jobs** icon on the right can be clicked to jump directly to the **Monitoring** → [Jobs](https://docs.primeur.com/data-mover-1.20/monitoring/jobs/job-monitoring) section and check the jobs belonging to the queue.
* The **3-dots icon** shows the Edit and Delete options. Note that:
* The default queue cannot be edited or deleted, so the 3-dots icon is not present.
* The name of the queue cannot be edited.
* A queue cannot be deleted if it has jobs still to be scheduled and if it is associated with a contract.
On the right-hand side of the screen, the **Filters panel** can be used to run queries by queue name or status:
* The **Queue name** drop-down list proposes all already created queues.
* The **Queue status** contains the ENABLED and DISABLED options. Scheduled queues fall into ENABLED.
**Jobs** icon on the right can be clicked to jump directly to the **Monitoring** → [Jobs](https://docs.primeur.com/data-mover-1.20/monitoring/jobs/job-monitoring) section and check the jobs belonging to the queue.
* The **3-dots icon** shows the Edit and Delete options. Note that:
* The default queue cannot be edited or deleted, so the 3-dots icon is not present.
* The name of the queue cannot be edited.
* A queue cannot be deleted if it has jobs still to be scheduled and if it is associated with a contract.
On the right-hand side of the screen, the **Filters panel** can be used to run queries by queue name or status:
* The **Queue name** drop-down list proposes all already created queues.
* The **Queue status** contains the ENABLED and DISABLED options. Scheduled queues fall into ENABLED.