Primeur Online Docs
Data Mover 1.20
Data Mover 1.20
  • 🚀GETTING STARTED
    • What is Primeur Data Mover
    • Main features of Primeur Data Mover
    • Primeur Data Mover deployment
    • Navigate through Primeur Data Mover
  • 📚INFRASTRUCTURE
    • STENG, clusters and servers
      • Adding a cluster and a STENG
      • Deleting a STENG
    • DMZ Gateways
      • Blocking users automatically at the DMZ level 🚀
    • DMZ Clusters
      • Load balancing across active DMZ clusters for outbound file transfers 🚀
  • 👥Actors
    • Who are the actors
    • Create your first actor
    • Configure an actor 🚀
      • Users Tab
      • Groups Tab
      • VFS Tab
      • File Resource Tab
      • Connection Contract Tab
      • Client Connections Tab
    • Search files by actor
    • Actor Lineage 🚀
      • Aggregation of flows by protocol 🚀
      • Lineage with connection contracts 🚀
      • Lineage with input, mediation and output contracts 🚀
      • Lineage with any contract type 🚀
  • 🗄️VIRTUAL FILE SYSTEMS
    • Virtual File Systems (VFS) 🚀
      • Creating a VFS 🚀
      • Configuring a VFS
      • Adding Virtual Paths
      • Modifying and Deleting a VFS
    • Searching files in all VFS
    • Storage Classes 🚀
      • Storage Class: SMB v3 or later versions 🚀
      • Storage Class: Azure Blob Storage 🚀
      • Storage Class: Amazon S3 🚀
      • Storage Class: Google Storage 🚀
      • Storage Class: Local File System 🚀
    • Retention Classes
  • 📝Contracts
    • What is a contract
    • Create your first contract
      • Create an Input Contract
        • Define the contract info
        • Associate the contract with the actor
        • Define the contract actions
        • Set the contract variables
      • Create a Mediation Contract
      • Create an Output Contract
      • Create a Connection Contract
        • Create a contract clause
        • Associate the VFS with file processing rules
        • File Processing Rules
    • Managing contracts 🚀
    • File Resources
      • Creating File Resources
      • Navigating File Resources
      • How to use File Resources
  • 🧱Workflows
    • What is a workflow
    • Create your first workflow template
    • Trigger types
      • Trigger types for input contracts
      • Trigger types for mediation and output contracts
    • Service tasks
      • Standard service tasks
      • Triggerable service tasks 🚀
      • Spazio selectors and filebox metadata management
      • Error management
    • Variables
      • Variables in workflows and contracts
      • Handling process variables
    • Workflow templates
      • System workflow templates
        • Workflow templates for input contracts
        • Workflow templates for mediation contracts
        • Workflow templates for output contracts
      • Custom workflow templates
        • Workflow template toolbar
        • Workflow template Shape repository panel
        • Workflow template working area
        • Workflow template BPMN-diagram panel
      • Error workflow templates
    • Editing workflow templates
    • DataFlow Instance Context (DFIC) 🚀
  • 🛸TRANSPORT PROTOCOLS AND CONNECTORS
    • Data Mover client and server roles
    • Client Connections
      • Client Connection: FTP
      • Client Connection: FTPS
      • Client Connection: SFTP
      • Client Connection: HTTP
      • Client Connection: HTTPS
      • Client Connection: PESIT
      • Client Connection: SMB v3 or later versions
      • Client Connection: POP3 or IMAP
      • Client Connection: SMTP
      • Client Connection: PR4/PR4S
      • Client Connection: PR5
      • Client Connection: PR5S
      • Client Connection: HDFS
      • Client Connection: HDFSS
      • Client Connection: Amazon S3 🚀
      • Client Connection: Google Cloud Storage
        • Credentials
      • Client Connection: Azure Blob Storage
      • Client Connection: IBM Sterling Connect:Direct
      • Appendix
    • Server Connections 🚀
      • Server Connection: FTP
      • Server Connection: FTPS
      • Server Connection: SFTP
      • Server Connection: HTTP
      • Server Connection: HTTPS
      • Server Connection: PeSIT
      • Server Connection: PR4
      • Server Connection: PR5
      • Server Connection: PR5S 🚀
      • Server Connection: IBM Sterling Connect:Direct
    • Stopping all servers in one go
  • 💻API
    • HTTP MFT Rest API
    • Job Manager APIs 🚀
    • SFTP Server sessions APIs 🚀
    • Audit Logs APIs 🚀
  • 🔓Security
    • Identity and Access Management
    • Users & Groups
      • Setting the password policy
      • Creating Internal Users 🚀
      • Creating Internal Groups
      • Creating External Users
      • Creating External Groups
    • Key Stores and Trust Stores
      • Key Store 🚀
        • Creating a Key 🚀
        • Creating a Certificate 🚀
        • Importing a Key or a Certificate
        • Creating a Symmetric key
        • Examples
      • Trust Store 🚀
        • Importing Keys 🚀
        • Importing Certificates
      • Untrusted Cache 🚀
      • Trusting Keys and Certificates
      • PGP Key Store and PGP Trust Store
        • PGP Key Store
        • Importing keys into the PGP Trust Store
    • ICAP
      • Configuring ICAP
      • Defining an ICAP rule
  • 🎧FILE EVENT LISTENER
    • What is the File Event Listener
    • Configuring File Event Listeners
      • Setting the File Event Listener Engine
      • Defining a contract for the File Event Listener
      • Setting events to be monitored 🚀
    • RegEx Rules 🚀
    • Monitoring File Event Listeners
  • 👑FILE MANAGER
    • What is the File Manager
    • Logging into File Manager
    • Managing the File Manager 🚀
      • The list of results
      • Creating new folders
      • Uploading files
      • Downloading files 🚀
      • Searching for files and folders
      • Deleting files 🚀
      • Bulk actions 🚀
    • File Manager and VFS
    • Customizing File Manager externals
      • The configuration-wui.json file 🚀
      • How to customize the Login window and the logo
      • How to customize the footer
      • How to configure the Upload with Metadata option
      • How to customize bulk actions 🚀
  • 🧑‍⚖️FILE ROUTING
    • What is File Routing 🚀
    • Routing Rules
      • The Rules tab
      • The Categories tab
      • The Output tab
    • How to create a rule 🚀
      • Add metadata 🚀
      • Select ACTIONS
      • Select OUTPUTS
      • Policy for the selection of metadata rules
    • Configuration of the environment in Data One
      • Set up Storage Classes
      • Set up Retention Classes
      • Configure the Actor
      • Set up File Resources
    • Associate the Routing Rule with a Contract
    • Example
  • 📩NOTIFICATION CHANNELS
    • What are Notification Channels
    • Configuring the default Email Notification Channel
    • Configuring a new Email Notification Channel
    • Trusting Certificates
    • Managing Templates
      • Data Watcher Macros
      • Contract Macros
      • ICAP Macros
      • Central Log Macros
      • Email Templates
      • Editing default templates
      • Loading a new template
  • 💬LOGS & AUDIT
    • Logs 🚀
      • Logs options 🚀
      • Troubleshooting error analysis in Logs
    • Audit Options 🚀
      • Export audit logs 🚀
      • List of Audit entity types 🚀
      • Audit message codes 🚀
    • Log Notifiers 🚀
      • FEL message codes
  • 🕒MONITORING
    • Jobs
      • Details about Jobs 🚀
      • jobman.sh CLI
    • Job Manager
    • Job Queues
      • Managing Job Queues
    • File Transfers
      • Ongoing
      • Finished
      • Reports
    • File Transfers Rules
      • Configuring Rules
  • 🧐HOW TO...
    • ... use different DNS names - NEW! 🚀
    • ... configure a Cron Expression
    • ... configure an application
    • ... customize a header
    • ... run searches in Data Watcher 🚀
    • ... use Data Shaper graphs in Data Mover contracts
    • ... modify DMCFG and deploy it
    • ... tune Data One data retention
    • ... fine tune Data Mover
  • 🗒️RELEASE NOTES
    • Data One 1.20.10
    • Data One 1.20.9
    • Data One 1.20.8
    • Data One 1.20.7
      • Data One 1.20.7.1
    • Data One 1.20.6
    • Data One 1.20.5
    • Data One 1.20.4
    • Data One 1.20.3
    • Data One 1.20.2
    • Data One 1.20.1
    • Data One 1.20.0
Powered by GitBook
On this page
  • Create a new VFS
  • Create a new VFS view
  • Bind an existing VFS
  1. Actors
  2. Configure an actor 🚀

VFS Tab

PreviousGroups TabNextFile Resource Tab

Last updated 22 days ago

A VFS is a container that stores in-transit files. In this tab of the Actors page, you can manage the VFS associated with the actor.

Here are the options available:

  • Create a new VFS: a new VFS can be created and associated with the actor.

  • Create a new VFS view: a special view on one or more VFS can be created and associated with the actor.

  • Bind an existing VFS: an existing VFS can be searched and associated with the actor.

In this section, an overview of the main options available in the Actors page of Data Mover is given. For all the details, refer to the section.

Create a new VFS

By clicking the NEW button, you can create a new VFS that will be automatically assigned to the selected actor.

The fields to be filled in the New Virtual File System window are described in the page.

Create a new VFS view

By clicking the NEW VFS VIEW button, you can create a special view of the VFS so that the actor will see a specific subset of the folders belonging to the VFS – and not the full VFS. Moreover, separate VFS can be selected to create one single VFS that will aggregate all the selected folders.

Creating a VFS view means that a specific portion of one or more VFS can be selected so that the user accessing the VFS will see a subset of folders. This feature is useful for Customers having complex file systems, which can be aggregated and shown in one single view. Moreover, the view can be changed dynamically simply configuring the group to which the users belong.

To create a view of the VFS, follow these steps:

  1. On the Actors page, click the NEW VFS VIEW button.

  2. In the Virtual File System View window, assign a name to the view you are creating and click NEXT.

  3. In the Choose VFS drop-down list, select the VFS.

  4. All the folders belonging to the selected VFS will be listed. Click the icon to select the folder that will be assigned to the VFS view you are creating. Note that: - Once selected, the folder will be greyed out. - If you select a parent, the parent folder and all its children will be added to the view. - If you select a child, only the child will be added to the view. - When you select the last child, the parent folder will be greyed out.

  5. The folders selected will be listed on the right of the window. To remove a folder from the view, just click the trash-bin icon on the right.

If a Virtual Path of a VFS or a VFS view is used in a Connection Contract, it cannot be removed. If any subfolders of the Virtual Path are used in a Connection Contract, the Virtual Path cannot be deleted. A warning message will appear listing the Connection Contracts using the Virtual Path.

  1. To add the folders of a different VFS, select the new VFS in the VFS drop-down list on the left and assign the new folders. As you will see, the VFS name and the path of the VFS folder are shown in the format VFS_NAME:/VFSFolder_path (e.g. VFS-NASA:/Missions/2020/January).

Virtual folders with the same name cannot be added, even if they belong to different VFSs and have different paths. A message will appear warning you that the operation cannot be done.

  1. Once you have added all the folders you need, click the Save button to create your VFS view.

If the VFS has more than 50 folders, these are displayed on multiple pages that can be navigated by selecting the options available at the bottom of the window. The First, Previous, Next and Last buttons will drive you to the relevant page. Note that the number of folders displayed on each page is set to 50 and is not configurable.

The VFS view you have created will be added to the result list.

In the result list, two different icons are assigned:

Bind an existing VFS

By clicking the BIND VFS button, you will associate an already existing VFS with the actor.

The Bind VFS window will appear, with a search bar to search for the VFS and the list of existing VFS. Using the search bar is useful to filter results, especially when dealing with a large number of VFS.

Select the VFS you want to assign to the actor and click the Confirm button.

to the VFS view

to the complete VFS (Master).

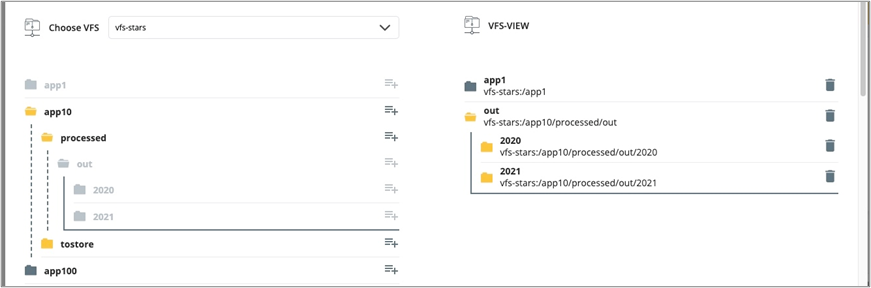
The VFS view can be checked or edited by clicking the icon. To remove a folder listed in the VFS view, click the trash bin icon next to the folder.

The toolbar can be used to list both VFS and VFS views (All), only VFS (VFS) or only VFS views (View). Using these buttons to filter results is useful when dealing with a large number of VFS and views.

👥
Virtual File Systems
Creating a VFS