Configuring an actor 🚀
Last updated
Last updated
To start, either click the name of the Actor or the icon to the right of the Actor in the list of results and choose the Edit option. The details of the selected Actor will be displayed on a new page.
In the upper part of the screen, you will see the Image, Name, Description and if the actor is assigned to a Group or not. Remember that you can always Edit an actor by clicking the icon or Delete it by clicking the icon. You can find both icons at the top right of the page.
These are all useful reminders of an actor's details. Yet, the real configuration starts in the main section of the page.
The main section of the Actor page is divided into different tabs. Each tab gives you access to different configuration options:
You can find a complete description in the next sections.
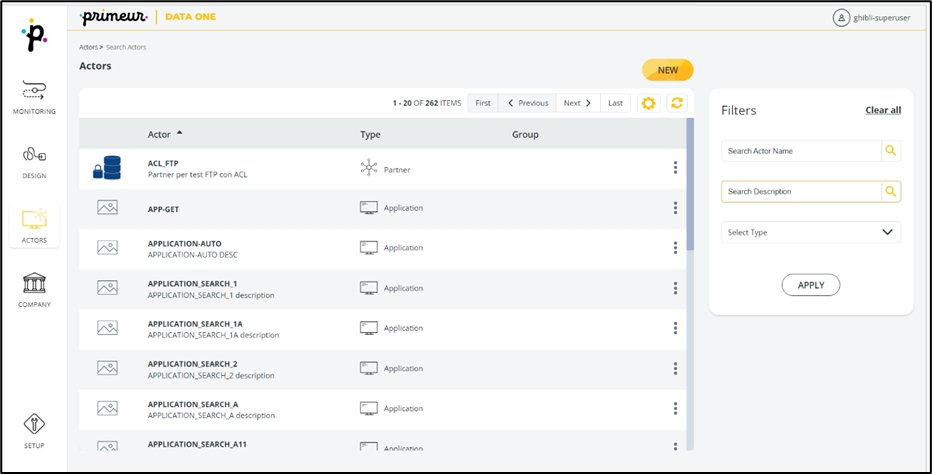
Apart from the list of results, this page has a breadcrumb trail, a navigation bar, and a panel with filters.
The breadcrumb trail at the top-left corner of the screen helps you to understand where you are. Since all the elements of the breadcrumb trail are clickable, you can click them to jump to the relevant position.
The navigation bar is at the top of the list of results and offers:
Buttons to jump to the First, Previous, Next, and Last page.
Ability to set the number of items that you want to display on each page choosing among 10, 20, and 50 items.
Ability to refresh the list.
The Filters panel is located on the right and allows you to search Actors by:
Actor Name: enter the name of the Actor you are searching for, and press Enter on your keyboard or the Apply button. The edit box is case-insensitive. The search can be run even if you enter one single character – letter or number. Boolean searches are not supported.
🚀 Actor Description: enter the description of the Actor you are searching for, and press Enter on your keyboard or the Apply button. The edit box is case-insensitive. The search can be run even if you enter one single character – letter or number. Boolean searches are not supported.
Actor Type: select the type of Actor you want to retrieve – Application and/or Partner – and then click the DONE button. The chip or chips of the Actor type will appear.
To run the query, click the Apply button. The result list will be updated with the Actors satisfying the filters you have specified. To remove all filters in one go, click Clear all at the top-right corner of the Filters panel. To remove a specific value, click the x in the chips or in the Actor edit box.
: to create and manage the users assigned to the Partner.
: to create and manage the groups assigned to the Partner.
: to configure the VFS the Partner will access.
: to set any stream processing to be performed on received or sent data.
: to define the mapping between a User/Group, a Local Server, and a Virtual File System. There can be one and only one Connection Contract for each Actor (i.e., Company, Partner, or Application).
: to set client connection parameters - including security configuration.