Create your first workflow template
Primeur provides a service for creating custom system templates to meet individual customers' needs. This service is for customers who require support in creating workflow templates.
For mediation contracts, workflow templates must be designed going to Design → Workflows.
For input and output contracts, Primeur provides system workflow templates and they are the only ones that must be used.
In essence, if the workflow indicates the action to be taken following to an event, the contract specifies where to perform that action.
In Data Mover, a workflow provides a visual representation of a business process in the form of a diagram. A workflow template can be used in any contract and configured with specific variables that meet the unique needs of each actor.
Keeping in mind that workflow templates must be designed to meet specific needs occurring in mediation contracts, let's look at how to create a workflow template that copies files from one directory to another within Data Mover. The service task involved is the Republish service task.
Go to Design → Workflows and click the New button.
Workflows can also be imported by clicking the  button.
In the New template window:
Assign a Name and enter a Description to the workflow template you are creating, e.g., Republish.
Select the Trigger that will start your workflow template: e.g., new file.
Select the Status of your workflow template:
Ready: the workflow is ready and can be associated with a mediation contract.
In Progress: the workflow is still a draft. It is saved as template but cannot be associated with any mediation contract.
Click the CREATE button and the Workflow Template page will appear.

Select the Republish service task in the Shape repository list on the left. You can either scroll the list or filter the service tasks entering a portion of the name in the field with the lens.
Drag the service task from the Shape Repository and drop it on the white dashboard.
To connect 2 service tasks, select the starting service task. Multiple icons will appear around it.
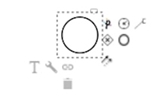
Select the 2 arrows
 appearing in the bottom-right corner.
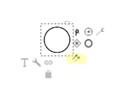
Drag the mouse cursor towards the service task you want to connect. As soon as you start moving the mouse, the icons around the starting service task will disappear and will be replaced by a no-access sign and an arrow.

When reaching the service task, the no-access sign will become a check sign. Drop the mouse cursor and the 2 service tasks will be connected by a black arrow.

Select the End event service task on the Shape repository and drop it on the right of the Republish File service task. Then connect them with the arrow.

Click the Republish File service task and go to the More panel to enter the macros in the variables that must be filled in:
Destination (Virtual Path): path where the files will be republished.
Fileset ID (Long): id of the file that triggers the workflow and that will be republished.
Save clicking the
 icon on the toolbar.
Once you have saved your workflow, go back to the Results section by clicking on the breadcrumbs or the Back button of your browser. Be careful! Unsaved progress will be lost if not previously saved.
Your workflow template is listed in the Results section and is ready to be used in a mediaiton contract.
Last updated