Protocol Download/Upload
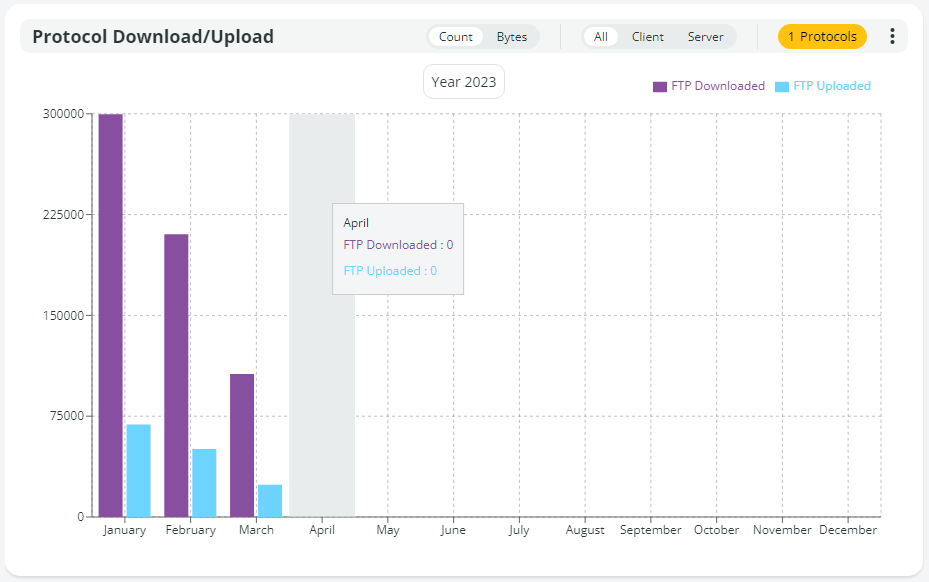
The Protocol Download/Upload card compares the number of transfers or the size (in bytes) of the transfers downloaded and uploaded. Each protocol has a color assigned and a legend is available on the right of the graph.
Refer to the Adding Cards page for detailed steps.
By default, no protocol is selected and the graph is empty. To have data shown, click the  chip on the top right corner, next to the 3-dot button and select one protocol in the window that appears. The graph will be updated and will show data as in the following figure.

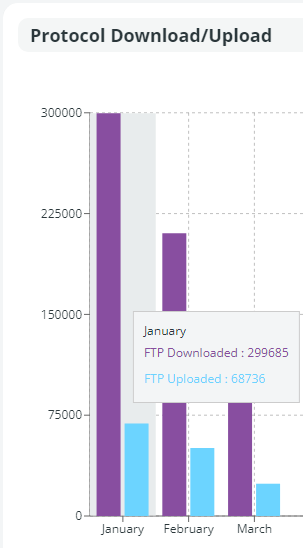
If you move the mouse over a bar, a tooltip will appear showing the number of transfers or the bytes downloaded and uploaded on the protocol. In the following figure, the tooltip shows data relevant to the month of January.

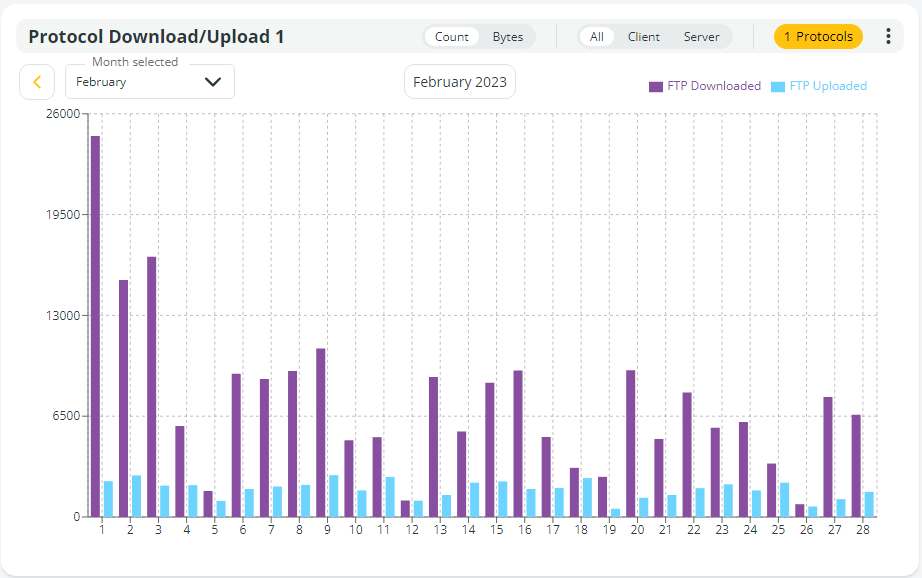
Clicking on a graph cell updates the graph to display a smaller time period. For example, if the original time period is the year, clicking a cell belonging to the month of February, the graph will be updated with the days of the month. Clicking the cell belonging to a day, the graph will be updated with the single hours of that day. And so on up to the single minute.
As shown in the following figure, the graph showing single months now shows the single days of the month of February.

You can select a different time period in the drop-down list located just below the card name.
Clicking the 3 dots button in the upper right corner of the card, the following options will appear:
- Filter: Filter the data displayed on the card according to the following criteria:
- Filename: Enter the name of the file for which you want to see the download and upload of transfers or bytes on the selected protocol. The specified string will be searched in all filenames, i.e. writing march will return all filenames that contain march anywhere in the filename. The graph will list all flows containing the filename or string entered.
- Outcome: select SUCCESS, FAILURE or ERROR. Once the filter is applied, the card will display only the results that match the selected criterion.
- Source: If you want to see all the transfers downloaded and uploaded for the selected protocol on a specific source, enter the name of the source in this field.
- Destination: If you want to see all the transfers downloaded and uploaded for the selected protocol on a specific destination, enter the name of the destination in this field.
- Source Queue: If you want to see all the transfers downloaded and uploaded for the selected protocol on a specific source queue, enter the name of the queue in this field.
- Destination Queue: If you want to see all the transfers downloaded and uploaded for a specific destination queue, enter the name of the queue in this field.
In the Filters window, to remove an option, click the red X.
The RESET button restores default settings.
In the Protocol Download/Upload card, when a filter is applied, a funnel icon appears in the upper right corner to indicate that the results shown are a subset of the total. Clicking the funnel icon, all applied filters will be listed. To open the Filters window and edit them directly, click the pencil icon.
You can create as many cards as you need to meet the number of criteria you require. For example, you can create a card with outcome SUCCESS and another with outcome ERROR and a third card without filters; or a card for all sources and another for a specific source. And so on.
- Export CSV: Export or schedule the export of the list of results in .csv format.
- Export tab: Select the time range of the data to be exported. You can change default dates by clicking the From and/or the To edit box, choosing a different date, and clicking the APPLY button. Any filters applied are shown and you can choose to remove them. To do so, click the RESET option, and default settings will be applied to the export. Set if you want to be notified by email when export is completed.
- Schedule export tab: Choose the frequency of the export selecting Daily, Weekly or Monthly in the Scheduling type edit box. Any filters applied are shown and you can choose to remove them. To do so, click the RESET option, and default settings will be applied to the export. Set if you want an email to be sent to an email address to notify you when the export is completed. Enter a valid email address and click the + button to confirm.
- Export HTML: Export or schedule the export of the list of results in .html format, including the graph or not. The same options as the Export CSV menu are applied.
- Color: Select a different color for the external border of the card. Click the RESET button to restore default colors.
- Remove: Select the option to remove the card. Note that the card will be removed without any further prompting.
The Protocols Comparator card is equipped with a toolbar that allows you to:
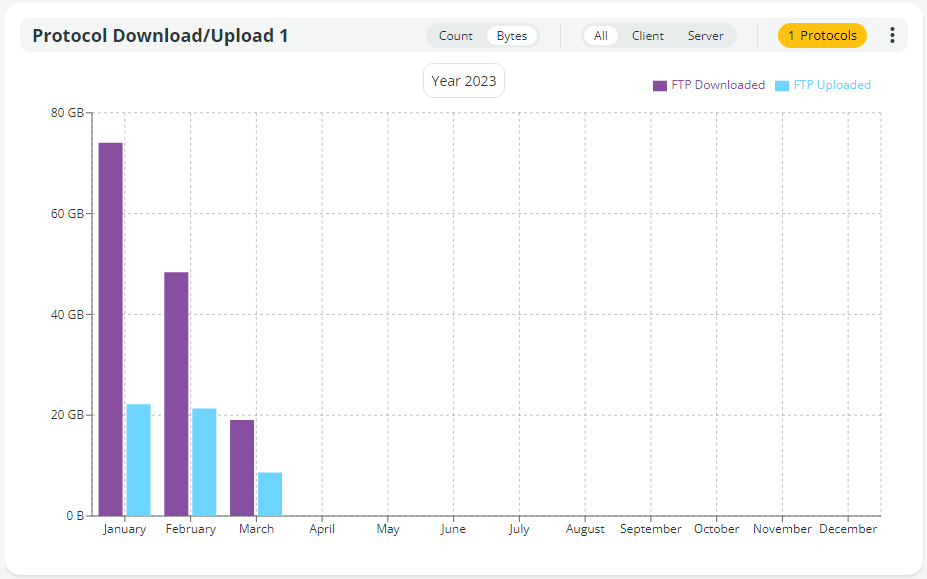
 switch from number of transfers (Count) or number of bytes uploaded or downloaded, as shown here below.

 switch transfer mode. You can see all transfers, transfers where Data One client, or server.
 chip to select the protocol for which you want to see the data.
Updated about 2 months ago
