Add virtual paths
When created, Virtual File System are empty and virtual paths must be added manually.
To add a new virtual path, follow these steps:
In the Virtual File System details page, click the 3‑dot menu next to the folder where you want to add a new path.
Select Add child to create a sub‑folder. This opens the Add child window:
Enter the Name of the new folder.
Select the Storage Class for the folder.
Select the Retention Class for the folder.
Enable or disable scanning options:
AV enabled: turn on antivirus scanning and select an AV ICAP Server.
DLP enabled: turn on DLP scanning and select a DLP ICAP Server.
Recursive ICAP configuration: if enabled, all new child folders will automatically inherit the same AV/DLP configuration as the parent.
In the NAME field of the Add child and Add sibling windows, these characters are supported:
all alphabetic characters, both uppercase and lowercase (A-Z, a-z)
numeric characters (0-9)
these special characters: blank ' + - ; , = _ ( ) [ ] { } & $ £ @ # ^ ! . % ~
These characters are not supported: " * / \ | : < > ? non-UTF8
Click SAVE to add the folder to the VFS. It will then appear in the results list.
If ACLs are enabled on the VFS. any child folder you create inherits all ACL permissions from the parent. Permissions applied to the parent are automatically applied to all children.
You may continue creating folders based on your directory structure. Use the 3‑dot menu options:
Add child: adds a new sub‑folder under the selected folder.
Add sibling: adds a new folder at the same level as the selected one.
Edit: opens configuration options for the selected folder:
Storage Class
Retention Class
Antivirus and DLP scan settings
Recursive ICAP configuration
Delete: removes the selected virtual path (when allowed).
Once your VFS contains virtual paths:
Click any folder to open it and view its content.
Use the navigation bar at the top of the Virtual Paths table to move through the hierarchy.

In the figure above, when you click > Design Phase, the view is updated and shows all the Virtual Paths contained within that folder. The full path of the selected folder is displayed at the top of the panel, allowing you to keep track of your position in the VFS hierarchy.
At the top of the panel, the breadcrumb trail shows the complete path of the selected folder. Each segment of the path is clickable, allowing you to jump directly to any parent folder with a single click. This makes navigation intuitive and efficient, especially in complex VFS structures.
Searching Virtual Paths
You can search for Virtual Paths by name within the folder currently selected:
Enter the folder name (or part of it) in the Search field.
The search applies only to the folder displayed above the field, and the name of the folder being searched is shown directly inside the input box.
Matching substrings appear highlighted in bold in the results list.
The panel indicates how many results match your query, for example: 1–2 of 2 ITEMS.
This allows you to quickly locate specific Virtual Paths without navigating manually through the structure.
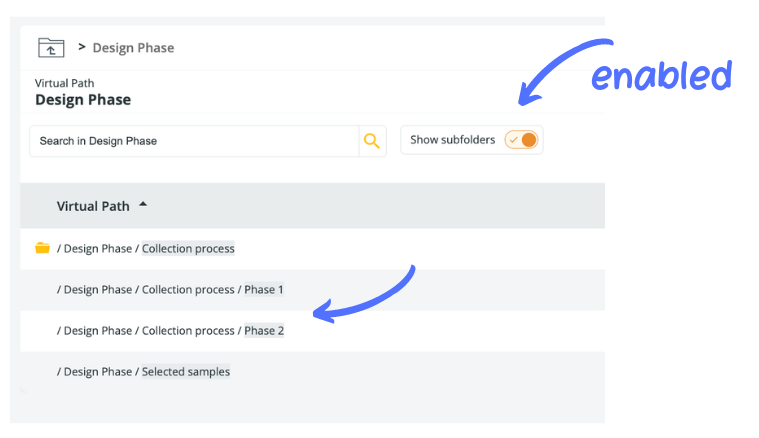
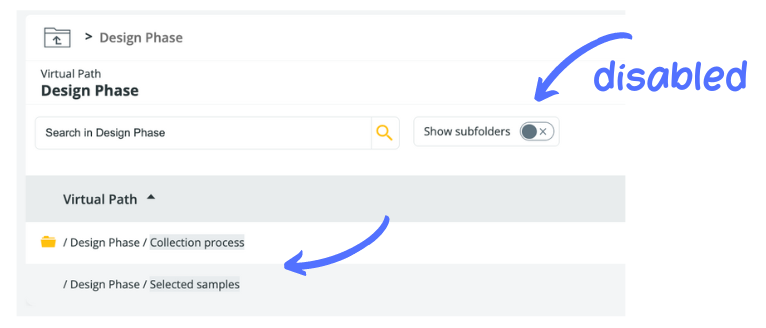
Viewing Subfolders
The Show subfolders toggle switch lets you control the scope of the display:
OFF (default): Only the subfolders directly under the selected Virtual Path are shown.
ON: All subfolders under the selected Virtual Path are displayed recursively across the entire VFS.
The screenshots illustrate the difference between the two views.
Results Table
Below the search panel, all items contained in the selected Virtual Path are listed in a table view. The table displays:
Virtual Path
Users assigned to that folder
Groups assigned to that folder
You can use the 3‑dot menu on each row to access folder-specific operations such as editing or adding child/sibling paths.
Last updated