Data Watcher roles - NEW! 🚀
Last updated
Last updated
The following roles are created when installing Data Watcher and cannot be modified or deleted:
Administrator: it has all the permissions to set up and manage features. Administrators can create and manage roles to assign users specific permissions that determine the operations they can execute within Data Watcher.
Operator: it has permission to execute operational activities such as viewing all dataflow models, flow instances, and attributes, tagging a flow instance, and managing saved queries.
Modeler: it has permission to execute modeling activities such as managing dataflow models and attributes, viewing all flow instances, managing saved queries, cut-offs, and email templates, and viewing notification channels,
To improve user management in the organization, other roles can be added. For example, an Analyst role can be created with a specific set of permissions just for Analysts. When setting up a new user in this role, the administrator can apply the predefined Analyst permissions all at once. This process reduces the chances of making mistakes that can happen when selecting permissions individually. This method speeds up user setup and ensures that permissions are assigned consistently across all Analyst users.
To create a new role, follow these steps:
Go to Setup and click the Roles chip.
Click the NEW ROLE button.
In the New role window, assign a unique name to the role you are creating.
In the panel on the right, enable the permissions you want to assign to the role. By default, all permissions are listed, and you can filter them by typing part of the name in the field with the lens at the top. You can also type the Entity (e.g. CALENDAR) to list all permissions belonging to the Calendar feature at once. You can also see only the already assigned permissions by clicking on the icon. The icon becomes a closed eye and to list all permissions again, you must click on it.
Click the Save button to confirm.
The created role is available when creating or editing users, allowing the administrator to assign role permissions to users without having to select them individually.
To assign a role to a user, follow these steps:
As Administrator, go to Setup and click the Users chip.
Click the NEW USER button or edit an existing user.
Fill in the necessary fields.
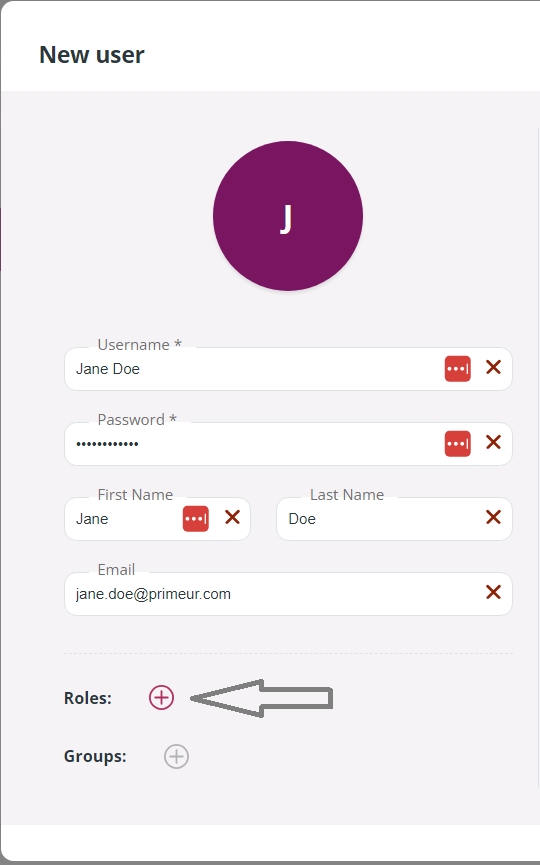
Click the + button next to Roles:
In the Add Roles window, identify the role you want to assign to the user and click the + button on the right.
Click the Add button to confirm. All role permissions are automatically assigned to the user and, if necessary, more permissions can be added. If you add permissions, the user will have all permissions of the role plus all additional permissions assigned manually. Note that if the user belongs to a Group, the group permissions will be added as well. For clarity, the origin of each permission (role or group) is shown in brackets.
Click the Save button to confirm.
To delete a role, hover over the card and click the bin icon in the top right corner. Note that the Administrator, Operator, and Modeler roles cannot be deleted or modified.
To filter roles, use the Search Roles field at the top of the page.
To edit a role, click the role card and the Role configuration window will appear. Assigned permissions are listed. If you need to add permissions, click the icon and select the new permissions. Then, click Save to confirm.